TeX without TeX
Contents
Use TeX's power without TeX macros[edit]
With the Lua-part in LuaTeX you have access to most of TeX's capabilities for creating PDF documents. Most of the LuaTeX reference manual is about this topic.
Remember that you can jump into Lua mode from TeX with \directlua{...Lua code...}. For example this plain TeX document prints the first digits of the value of pi: $\pi = \directlua{ tex.print(math.pi)}$ \bye. You can get the result PDF by running luatex testfile.tex.
The underlying idea is to create TeX's internal data structure as TeX would do by transforming macros and primitives into something called nodes. These nodes are then transformed into instructions for the PDF file (PDF objects). So the following pages deal with node creation and the structures.
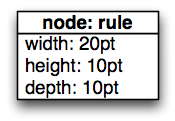
Let's start with a rule node. When you write \hrule width 20pt height 10pt depth 10pt in TeX, a node of type rule will be created, which has three fields: height, depth and width. We can visualize this node by a simple box like this:
The same can be done directly in Lua:
r = node.new("rule")
r.width  = 20 * 65536
r.height = 10 * 65536
r.depth  = 10 * 65536
Some remarks: the size is in scaled points, and 65536 (=216) scaled points are 1 point, so 20pt becomes 20 * 216. Not shown in the example are (among others) the next and prev fields. These fields hold a pointer (the node address) to the following and the previous nodes. A node that exist by itself has its prev and next fields set to nil.
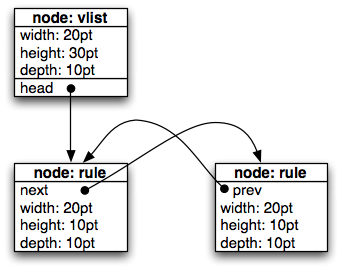
A slightly more complicated example is when you create two rules and pack then into a vertical box. This would look like this in plain TeX:
\vbox {\hrule width 20pt height 10pt depth 10pt
           \hrule width 20pt height 10pt depth 10pt }
This would generate a node list like:
The same can be done directly in Lua:
r1 = node.new("rule")
r1.width  = 20 * 65536
r1.height = 10 * 65536
r1.depth  = 10 * 65536

r2 = node.new("rule")
r2.width  = 20 * 65536
r2.height = 10 * 65536
r2.depth  = 10 * 65536

r1.next = r2
r2.prev = r1

vbox = node.vpack(r1)
The result is a vbox containing the two rule nodes. The nodes are connected by their next and prev pointers, so the vbox contains them both. The size (width, height and depth) is adjusted automatically.
This also applies to all other things you can put on a TeX page: glyphs, horizontal boxes, math, images, hyperlinks, glue .... For a complete list of the nodes, see the reference manual Chapter 8 "Nodes".
Beyond reports and articles[edit]
Perhaps the question that comes into your mind is: why should I bother writing Lua code instead of TeX code? For many documents, including articles, reports and books, the classic way to create a PDF with TeX is to use LaTeX or ConTeXt. But there are applications that use TeX as an 100% automatic PDF generation software. If you want to create data sheets or product listings, your normal input is not a classic document, but most likely an Excel spreadsheet or an XML file, perhaps extracted from a database. You won't have any TeX markup within these documents. So: if you don't have TeX markup in these documents, you don't need the TeX interpreter to read these files. More likely is an XML parser or a spreadsheet 2 ... converter.
When you use regular LaTeX or ConTeXt code to put the contents of the database in your PDF (database publishing), you run into several problems:
- Exact positioning of items on the page can be troublesome
- catcodes / command escapes are to be considered and surely get into your way
- TeX is no fun to program in (well it is, but only for some people) - calculations, tests, exception handling, control flow
- The packages that exist may reach their limit soon. You need a super flexible image-between-columns-with-parshape package? Write it yourself.
With Lua you have a very decent programming language that is fun to program in. When you use the Lua interface to TeX, you have full control of what is happening, which is usually the level of control you need for high quality output.
One approach is to create a stub TeX file and let Lua do the rest:
\directlua{dofile("myprogram.lua")}
\end
The file myprogram.lua then contains all the code to a) read the source file(s), b) extract the information and create the appropriate nodes and c) instruct TeX to create PDF pages from these nodes.
In a future version of LuaTeX you will be able to run the Lua interpreter without the stub TeX file above.
A first example[edit]
The example document given below creates two pages by using Lua code alone. You will learn how to access TeX's boxes and counters from the Lua side, shipout a page into the PDF file, create horizontal and vertical boxes (hbox and vbox), create new nodes and manipulate the nodes links structure. The example covers the following node types: rule, whatsit, vlist, hlist and action.
In the example code we use black squares as the contents of the pages and not normal text, because character handling takes more code and will be covered later on.
Save the following file into myprogram.lua and use the TeX stub from above (or get the source here).
do
  -- this will hold the items that go onto the page
  local pagelist

  -- Call tex.shipout() with the contents of the pagelist
  function shipout()

    local vbox,b = node.vpack(pagelist) -- we ignore the badness 'b'
    tex.box[666] = vbox
    tex.shipout(666)

    pagelist = nil

    -- Not strictly necessary. TeX holds the current page number in counter 0.
    -- TeX displays the contents of this counter when it puts a page into
    -- the pdf (tex.shipout()). If we don't change the counter, TeX will
    -- display [1] [1], instead of [1] [2] for our two page document.
    tex.count[0] = tex.count[0] + 1
 end

  function add_to_page( list )
    -- We attach the nodelist 'list' to the end of the pagelist
    -- if pagelist doesn't exist, 'list' is our new pagelist
    -- if it exists, we go to the end with node.tail() and adjust
    -- the prev and next pointers, so list becomes part
    -- of pagelist.
    if not pagelist then pagelist = list
    else
      local tail = node.tail(pagelist)
      tail.next = list
      list.prev  = tail
    end
  end
end

-- This creates a new square rule and returns the pointer to it.
function mkrule( size )
  local r = node.new("rule")
  r.width  = size
  r.height = size / 2
  r.depth  = size / 2
  return r
end

do
  local destcounter = 0
  -- Create a pdf anchor (dest object). It returns a whatsit node and the
  -- number of the anchor, so it can be used in a pdf link or an outline.
  function mkdest()
    destcounter = destcounter + 1
    local d = node.new("whatsit","pdf_dest")
    d.named_id = 0
    d.dest_id = destcounter
    d.dest_type = 3

    return d, destcounter
  end
end

-- Take a list of nodes and put them into an hbox. The prev and next fields
-- of the nodes will be set automatically. Return a pointer to the hbox.
function hpack( ... )
  local start, tmp, cur
  start = select(1,...)
  tmp = start
  for i=2,select("#",...) do
    cur = select(i,...)
    tmp.next = cur
    cur.prev = tmp
    tmp = cur
  end
  local h,b = node.hpack(start) -- ignore badness
  return h
end

local tenpt = 10 * 2^16
---------------------------
-- page 1
---------------------------
local n,dest = mkdest() -- dest is needed for the link to this anchor

add_to_page(n)
add_to_page(mkrule(2 * tenpt))

-- The pagelist contains a pdf dest node (a link destination) and a rule of size 20pt x 20pt.

shipout()
---------------------------
-- page 2
---------------------------
-- This is the page with the link to the anchor (dest) on page one. A
-- link consists of three nodes: a pdf_start_link, a pdf_end_link and and
-- action node that specifies the action to perform when the user clicks on
-- the link.
-- The pdf link must be inside a horizontal box, that's why we hpack() it.
-- The link_attr (link attributes) is optional, here it draws a yellowish border
-- around the link.
local start_link = node.new("whatsit","pdf_start_link")
local end_link   = node.new("whatsit","pdf_end_link")

start_link.width     = tenpt
start_link.height    = tenpt / 2
start_link.depth     = tenpt / 2
start_link.link_attr = "/C [0.9 1 0] /Border [0 0 2]"

--start_link.action = node.new("action")
--there has been an update of the luatex
start_link.action = node.new("whatsit","pdf_action")
start_link.action.action_type = 1
start_link.action.action_id   = dest

local rule = mkrule(tenpt)
local hbox = hpack(start_link, rule, end_link)
add_to_page(hbox)

-- This pagelist consists of an hbox whose contents is "start_link",
-- the 10pt x 10pt rule and the "end_link" node.

shipout()
---------------------------

-- Just to show you that you can get some memory usage statistics:
print(string.format("\nnode_mem_usage=%s",status.node_mem_usage))
The idea is to create nodes, collect them in a list (here: pagelist) and use tex.shipout() to put the page into the PDF.
And what about real content?[edit]
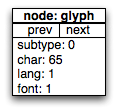
Black squares won't make anyone happy. So we need a typeset paragraph. For that we start with a single glyph and a glue first. A glyph node has this structure:
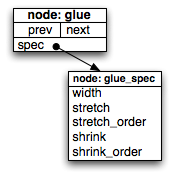
whereas a glue is more complicated:
The glue item comes in pairs: a glue node and a glue_spec node. The information about the shrink/stretch values go into the glue_spec node. For example, the TeX glue 2pt plus 1fill has a width of 2*216, a stretch of 216 and a stretch_order of 3.
local g = node.new("glyph")
g.font = font.current()
g.lang = tex.language
g.char = 86 -- V

local hbox = node.hpack(g)
local vbox = node.vpack(hbox)

node.write(vbox)
We create a glyph, pack it into an hbox (horizontal box), pack that hbox into a vbox (a vertical box) and write this box to the main vertical list. The char number (86 in the example above) is based on an internal encoding, so we have to keep an eye on what character is on what position. Now we do this for two glyphs:
local g1 = node.new("glyph")
g1.font = font.current()
g1.lang = tex.language
g1.char = 86

local g2 = node.new("glyph")
g2.font = font.current()
g2.lang = tex.language
g2.char = 97

g1.next = g2
g2.prev = g1

local hbox = node.hpack(g1)
local vbox = node.vpack(hbox)

node.write(vbox)
Pretty much the same as above. The glyphs g1 and g2 are chained together by setting the next and prev pointer to each other. If they were not connected, only glyph g1 gets into the hbox.
If you take a close look at the PDF, you see that the two glyphs are too far away, a (negative) kern should be inserted. This can be done by inserting a kern-node manually or you can ask TeX to do that for you. The last lines of the example above should then read:
local head,tail,success = node.kerning(g1)
local hbox = node.hpack(head)
local vbox = node.vpack(hbox)

node.write(vbox)
With this approach you are able to put some glyphs into the PDF but you will run into problems when you want to create a whole paragraph. It is much easier to ask TeX to do the line breaking. The steps for paragraph creation are
- put glyph nodes and glue nodes in a list (= chain them together with the prev/next pointers)
- add trailing infinite penalty and parfillskip
- call lang.hyphenate(), node.kerning() and node.ligaturing() to prepare the list for the linebreaking job
- call tex.linebreak()
For the next task we want to create the following paragraph:
We start with the small TeX stub as above:
\directlua{dofile("myprogram.lua")}
\end
and myprogram.lua (download) defines a function mknodes() that creates the list of nodes to be passed into the typesetter.
function mknodes( text )
  local current_font = font.current()
  local font_parameters = font.getfont(current_font).parameters
  local n, head, last
  -- we should insert the paragraph indentation at the beginning
  head = node.new("glue")
  head.spec = node.new("glue_spec")
  head.spec.width = 20 * 2^16
  last = head

  for s in string.utfvalues( text ) do
    local char = unicode.utf8.char(s)
    if unicode.utf8.match(char,"^%s$") then
      -- its a space
      n = node.new("glue")
      n.spec = node.new("glue_spec")
      n.spec.width   = font_parameters.space
      n.spec.shrink  = font_parameters.space_shrink
      n.spec.stretch = font_parameters.space_stretch
    else -- a glyph
      n = node.new("glyph")
      n.font = current_font
      n.subtype = 1
      n.char = s
      n.lang = tex.language
      n.uchyph = 1
      n.left = tex.lefthyphenmin
      n.right = tex.righthyphenmin
    end

    last.next = n
    last = n
  end

  -- now add the final parts: a penalty and the parfillskip glue
  local penalty = node.new("penalty")
  penalty.penalty = 10000

  local parfillskip = node.new("glue")
  parfillskip.spec = node.new("glue_spec")
  parfillskip.spec.stretch = 2^16
  parfillskip.spec.stretch_order = 2

  last.next = penalty
  penalty.next = parfillskip

  -- just to create the prev pointers for tex.linebreak
  node.slide(head)
  return head
end

local txt = "A wonderful serenity has taken possession of my entire soul, ... like mine."

tex.baselineskip = node.new("glue_spec")
tex.baselineskip.width = 14 * 2^16

local head = mknodes(txt)
lang.hyphenate(head)
head = node.kerning(head)
head = node.ligaturing(head)

local vbox = tex.linebreak(head,{ hsize = tex.sp("3in")})
node.write(vbox)
(You can safely skip this section if you are not interested in the details.)
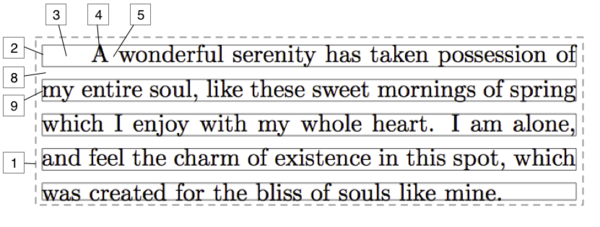
What has happened in detail? We have created a list of glyph and glue nodes and fed those into the line breaking part of TeX which gave us the vbox back. This vbox contains horizontal lists glued together:
The dashed rectangle (vbox) should fit tight to the inner hboxes. It has a small offset just for demonstration purpose.
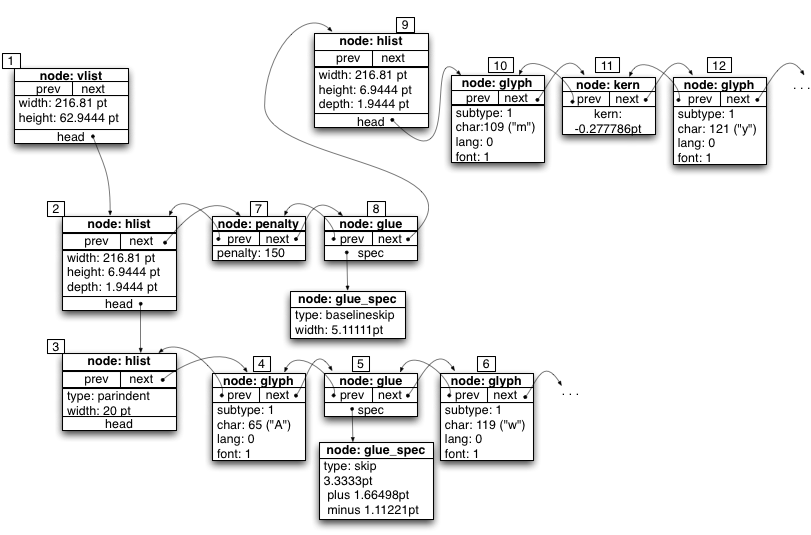
To show you some of the nodes that TeX inserted for you, have a look at the following image:
Here is an explanation of the nodes:
- This is the dashed line in the image above. A paragraph is always vertical
- The first line. It has a width of three inches, a height and depth of together 8.888 pt
- The 20pt paragraph indent. This is the first item in the first line (note that the pointer comes from the head item of the node #2
- The first letter in the first line
- The interword glue.
- The second letter in the first line
- The clubpenalty
- The baselineskip minus the height of the hbox "above" (8.888pt + 5.111pt is approx. 14pt. The rounding error is due to the display of only few significant digits.) Note that TeX is in vertical mode, as it is the third item in the vbox (#1).
- The hbox of the second line
- The first letter of the second line
- A kern between the m and the y of the first word (second line)
- The last letter shown here
There are many nodes created in the paragraph which are not shown here. A full view can be found in a separate PDF file.
Inserting images is easy[edit]
Now that you have survived the hard part of this tutorial, we get to something easier. Image inclusion. There are several ways to do this, and in my opinion this is the easiest. We again start with our plain (lua)TeX stub:
\directlua{dofile("includeimage.lua")}
\end
and includeimage.lua is this small lua chunk:
local image_fixed = img.scan({filename = "oilpainting.jpg"})

local image     = img.copy(image_fixed)
local halfimage = img.copy(image_fixed)

halfimage.height = halfimage.height / 2
halfimage.width  = halfimage.width  / 2

node.write(img.node(image))
node.write(img.node(halfimage))
You might be able to guess what happens here. We load the image oilpainting.jpg with img.scan but do not write it out to the PDF file yet. We create a copy of the image data so we can manipulate the size for example (another option would be to obtain a specific page of a PDF document or do some rotation). After that we write a reference to that image to the PDF file. In the case above, two references to the image (XObject) get written but the image is only written once. That is easy, right?
You can get an impression how the resulting document looks like:
Hyphenation[edit]
Every now and then you have to hyphenate your words in other languages. When you create the paragraph to be hyphenated (with lang.hyphenate()), you assemble it by creating glyph nodes which have a field lang (see above). This field accepts a number, the language id. So: how do we "create" a language? The first steps are simple, we start without TeX stub again:
\directlua{dofile("hyphenation.lua")}
\end
and the file hyphenation.lua is:
local path = kpse.find_file("hyph-de-1996.pat.txt")
local l = lang.new()

local hyph_file = io.open(path)
lang.patterns(l,hyph_file:read("*all"))
hyph_file:close()
Now the function lang.id(l) returns the language id of the language l, which we can use in the glyph nodes. A peculiarity of TeX prevents that we can start with that right away. All characters that are in the paragraph get lowercased before hyphenation rules apply. So how will a word like "Œuvre" be converted to lowercase? TeX has an internal table called lccode where it looks up a character and the output is its lowercase variant. So the lccode of Œ would be œ, but as TeX stores numbers, the lccode of 338 is 339. But only lccodes of the letters A-Z and a-z are set, so we need to set the codes for all other characters that appear in a text. In TeX you would write:
\lccode`\Œ=`\œ
\lccode`\œ=`\œ
or
\lccode338=339
\lccode339=339
You see that you need to set the lccode of the lowercase characters as well. In Lua you do something similar:
tex.lccode[unicode.utf8.byte("Œ")] = [unicode.utf8.byte("œ")]
tex.lccode[unicode.utf8.byte("œ")] = [unicode.utf8.byte("œ")]
or shorter:
tex.lccode[338] = [339]
tex.lccode[339] = [339]
Once you have set all the necessary lccodes (remember you don't need to do this with a to z and A to Z), you can expect the hyphenation to work.
